This post may contain affiliate links. As a Sheet Music Plus and Amazon Associate, I earn from qualifying purchases. That means I make a small commission (at no additional cost to you) if you purchase something from an affiliate link.
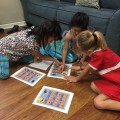
A group piano class online may be a great option for students during the current health pandemic. Students are stuck at home and miss seeing other children. One of the silver linings of this time is that piano students can now easily get together online.
I have always found scheduling group classes to be difficult with my students. Students have so many different activities during the week. In general, they have more availability at home now.
I have had several group piano classes for my students online. I chose to run the classes like a performance class, but there are many different things you can do in a class. Here is how to have a group piano class online.
I used Zoom for my online group piano class. Other options for a group class online would include Skype, Google Hangouts, or FaceTime. (FaceTime may not be a good option though since all users need an Apple device.)
The free version of Zoom allows group meetings under 40 minutes. For my online group classes, I had each student play for each other. It was an optional class that I offered to my students for free. I chose to do it for free since these are special times. It was worth it as they enjoyed hearing each other play.
How to set up your group piano class with Zoom:
- Once you have a Zoom account and are logged in, click “My Account” in the top right hand corner.
- Then click “Meetings” in the left menu panel.
- Click “Schedule a Meeting.”
- From here, you can fill in the information for your class. Enter the name, date, time, and duration of the class. You will also need to select your time zone.
- Finish the settings for the class. For “Meeting ID,” you can have Zoom create a random ID for the class or you can use the ID associated with your account. You can also set up a password for students to be able to enter the meeting.
- For “Video,” you can select whether you want the video of yourself (host) and the students (participants) to be on or off when entering the meeting. I selected “on.”
- “Audio” – Select “both” so that students have the option of which audio preference to use.
- “Enable Before Host” – I did NOT select this. If you allow students to join the meeting before you, it may affect your free 40 minutes for the class. I joined the class 3 minutes before my start time. Then my students could enter.
- “Mute participants upon entry”- Yes! If you have a lot of students participating, it will be very noisy. You’ll be able to unmute students as you’d like, but I preferred to have it muted as they joined the meeting.
- “Enable waiting room” – When students join the meeting, they are moved to the “waiting room.” You then have to allow each student into the meeting. I found this a little troublesome, so I did NOT select this option.
- “Record the meeting automatically on the local computer” – I did not record the meeting. If you would like to have a recording of the class, you could select to do so here. I prefer to protect the privacy of children, so in general I don’t do a lot of recordings.
- Once you complete your settings for the class, click save. Your meeting confirmation will include a link for the class. You can copy and paste this link and email it to your students. If you setup a password for the meeting, you can also email that to the parents when sending the link.
A few tips for the class:
- Once you are in your meeting on Zoom, you will have the ability to mute or unmute your participants all at once or one-by-one. You can choose how you want to run the group class.
- If you have a performance class like I did, you can introduce each student and talk about how long they’ve been playing piano. This is fun for students to hear!
- During this time, try to keep the class as simple as possible. Even a small 15-20 minute meeting can be fun for students.
- If you want to inspire your students, you might even consider playing for them!
Other Resources for Online Lessons:
3 Activities for Online Lessons
How to Teach Piano Lessons Online Lessons
Online Lessons Guide for Parents and Students
Digital Resources for Students

Lauren teaches piano to students of all ages. She enjoys creating resources for her students and teachers. She is the author of Ready for Theory®. For personalized help, check out the consultations page for teachers.